This is the multi-page printable view of this section. Click here to print.

Return to the regular view of this page.

Module 3 - VMware Site Recovery Manager (SRM)

Module 3: Setup SRM for Disaster Recovery to AVS

Site Recovery Manager

VMware Site Recovery Manager (SRM) for Azure VMware Solution (AVS) is an add-on that customers can purchase to protect their virtual machines in the event of a disaster. SRM for AVS allows customers to automate and orchestrate the failover and failback of VMs between an on-premises environment and AVS, or between two AVS sites.

For more information on VMware Site Recovery Manager (SRM), visit VMware’s official documentation for Site Recovery Manager.

This module walks through the implementation of a disaster recovery solution for Azure VMware Solution (AVS), based on VMware Site Recovery Manager (SRM).

Click here if you’d like to see 10 minutes demo for SRM on AVS.

What you will learn

In this module, you will learn how to:

  • Install Site Recovery Manager in an AVS Private Cloud.
  • Create a site pairing between two AVS Private Clouds in different Azure regions.
  • Configure replications for AVS Virtual Machines.
  • Configure SRM protection groups and recovery plans.
  • Test and execute recovery plans.
  • Re-protect recovered Virtual Machines and execute fail back.

Prerequisite knowledge

  • AVS Private Cloud administration (Azure Portal).
  • AVS network architecture, including connectivity across private clouds in different regions based on Azure ExpressRoute Global Reach.
  • Familiarity with disaster recovery DR concepts such as Recovery Point Objective (RPO) and Recovery Time Objective (RTO).
  • Basic concepts of Site Recovery Manager and vSphere Replication.

Module scenario

In this module, two AVS Private Clouds are used. VMware Site Recovery Manager will be configured at both sites to replicate VMs in the protected site to the recovery site.

Group X is your original assigned group, Group Z is the group you will be using as a Recovery site, for example, Group 1 will be using Group 2’s SDDC as a Recovery site.

For Example:

Private Cloud NameLocationRole
GPSUS-PARTNERX-SDDCBrazil SouthProtected Site
GPSUS-PARTNERZ-SDDCBrazil SouthRecovery Site

The two private clouds should have been already interconnected with each other in Module 1, using ExpressRoute Global Reach or AVS Interconnect. The diagram below depicts the topology of the lab environment.
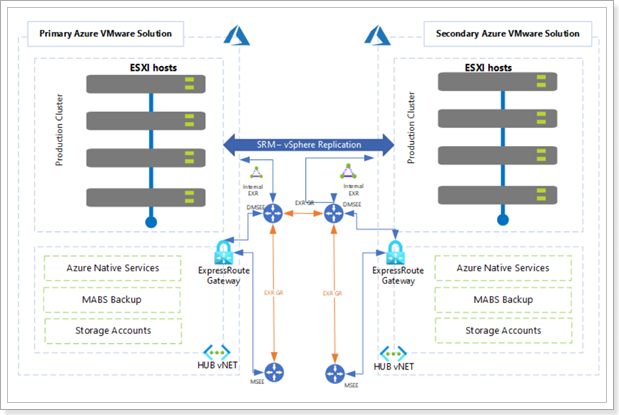
VMware Site Recovery Manager Information

Recovery Types with SRM

VMware Site Recovery Manager (SRM) is a business continuity and disaster recovery solution that helps you plan, test, and run the recovery of virtual machines between a protected vCenter Server site and a recovery vCenter Server site. You can use Site Recovery Manager to implement different types of recovery from the protected site to the recovery site:

Planned Migration

  • Planned migration: The orderly evacuation of virtual machines from the protected site to the recovery site. Planned migration prevents data loss when migrating workloads in an orderly fashion. For planned migration to succeed, both sites must be running and fully functioning.

Disaster Recovery

  • Disaster recovery: Similar to planned migration except that disaster recovery does not require that both sites be up and running, for example if the protected site goes offline unexpectedly. During a disaster recovery operation, failure of operations on the protected site is reported but is otherwise ignored.

Site Recovery Manager orchestrates the recovery process with VM replication between the protected and the recovery site, to minimize data loss and system down time. At the protected site, Site Recovery Manager shuts down virtual machines cleanly and synchronizes storage, if the protected site is still running. Site Recovery Manager powers on the replicated virtual machines at the recovery site according to a recovery plan. A recovery plan specifies the order in which virtual machines start up on the recovery site. A recovery plan specifies network parameters, such as IP addresses, and can contain user-specified scripts that Site Recovery Manager can run to perform custom recovery actions on virtual machines.

Site Recovery Manager lets you test recovery plans. You conduct tests by using a temporary copy of the replicated data in a way that does not disrupt ongoing operations at either site.

Site Recovery Manager supports both hybrid (protected site on-prem, recovery site on AVS) and cloud-to-cloud scenarios (protected and recovery sites on AVS, in different Azure regions). This lab covers the cloud-to-cloud scenario only.

Site Recovery Manager is installed by deploying the Site Recovery Manager Virtual Appliance on an ESXi host in a vSphere environment. The Site Recovery Manager Virtual Appliance is a preconfigured virtual machine that is optimized for running Site Recovery Manager and its associated services. After you deploy and configure Site Recovery Manager instances on both sites, the Site Recovery Manager plug-in appears in the vSphere Web Client or the vSphere Client. The figure below shows the high-level architecture for a SRM site pair.
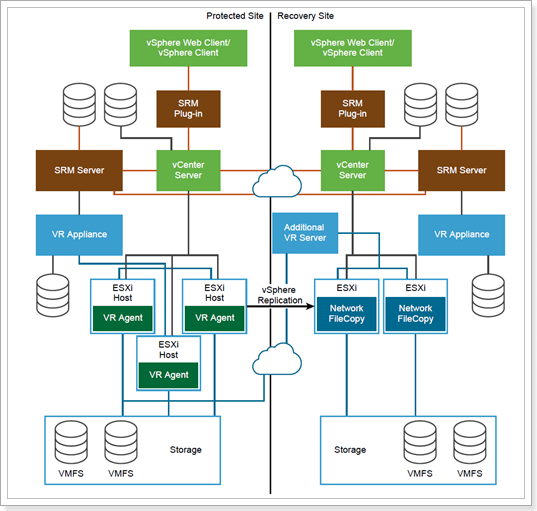
vSphere Replication

SRM can work with multiple replication technologies: Array-based replication, vSphere (aka host-based) replication, vVols replication and a combination of array-based and vSphere replication (learn more).

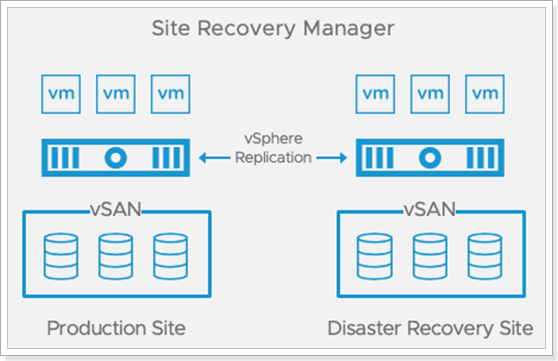
AVS Private Clouds run on hyperconverged physical infrastructure powered by VMware’s first-party storage virtualization software, vSAN. As such, the only replication technology that can be used with SRM in AVS is vSphere replication, which does not require storage arrays. With vSphere replication, the storage source and target can be any storage device. vSphere Replication is configured on a per-VM basis, allowing you to control which VMs are duplicated.
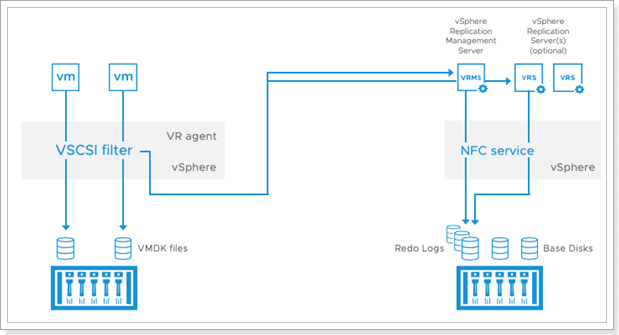
vSphere Replication requires a virtual appliance to be deployed from an Open Virtualization Format (OVF) file using the vSphere Web Client. The first virtual appliance deployed at each site is referred to as the vSphere Replication Management Server. It contains the necessary components to receive replicated data, manage authentication, maintain mappings between the source virtual machines and the replicas at the target location and provide support for Site Recovery Manager. Additional vSphere Replication appliances can be deployed to support larger-scale deployments and topologies with multiple target locations. These additional virtual appliances are referred to as vSphere Replication Servers.

The components that transmit replicated data (the vSphere Replication Agent and a vSCSI filter) are built into vSphere. They provide the plug-in interfaces for configuring and managing replication, track the changes to VMDKs, automatically schedule replication to achieve the RPO for each protected virtual machine, and transmit the changed data to one or more vSphere Replication virtual appliances. There is no need to install or configure these components, further simplifying vSphere Replication deployment.

When the target is a vCenter Server environment, data is transmitted from the source vSphere host to either a vSphere Replication management server or vSphere Replication server and is written to storage at the target location.
vSphere Replication begins the initial full synchronization of the source virtual machine to the target location, using TCP port 31031. A copy of the VMDKs to be replicated can be created and shipped to the target location and used as seeds, reducing the time and network throughput. Changes to the protected virtual machine are tracked and replicated on a regular basis. The transmissions of these changes are referred to as lightweight delta syncs. Their frequency is determined by the RPO that was configured for the virtual machine. A lower RPO requires more-frequent replication and network bandwidth consumed by the initial full synchronization.

The replication stream can be encrypted. As data is being replicated, the changes are first written to a file called a redo log, which is separate from the base disk. After all changes for the current replication cycle have been received and written to the redo log, the data in the redo log is consolidated into the base disk. This process helps ensure the consistency of each base disk so virtual machines can be recovered at any time, even if replication is in progress or network connectivity is lost during transmission.

Site Recovery Manager Concepts

Inventory Mappings

  • Inventory Mappings. For array-based protection and vSphere Replication protection, Site Recovery Manager applies inventory mappings to all virtual machines in a protection group when you create that group. Inventory mappings provide default objects in the inventory on the recovery site for the recovered virtual machines to use when you run recovery. Site Recovery Manager cannot protect a virtual machine unless it has valid inventory mappings. However, configuring site-wide inventory mappings is not mandatory for array-based replication protection groups and vSphere Replication protection groups. If you create vSphere Replication protection group without having defined site-wide inventory mappings, you can configure each virtual machine in the group individually. You can override site-wide inventory mappings by configuring the protection of the virtual machines in a protection group. You can also create site-wide inventory mappings after you create a protection group, and then apply those site-wide mappings to that protection group.

Protection Groups

  • Protection Groups. A protection group is a collection of virtual machines that Site Recovery Manager protects together. After you create a vSphere Replication protection group, Site Recovery Manager creates placeholder virtual machines on the recovery site and applies the inventory mappings to each virtual machine in the group. If Site Recovery Manager cannot map a virtual machine to a folder, network, or resource pool on the recovery site, Site Recovery Manager sets the virtual machine to the Mapping Missing status, and does not create a placeholder for it.

Recovery Plan

  • Recovery Plan. A recovery plan is like an automated run book. It controls every step of the recovery process, including the order in which Site Recovery Manager powers on and powers off virtual machines, the network addresses that recovered virtual machines use, and so on. Recovery plans are flexible and customizable. A recovery plan includes one or more protection groups. You can include a protection group in more than one recovery plan. For example, you can create one recovery plan to handle a planned migration of services from the protected site to the recovery site for the whole organization, and another set of plans per individual departments. You can run only one recovery plan at a time to recover a particular protection group.

Reprotection

  • Reprotection. After a recovery, the recovery site becomes the primary site, but the virtual machines are not protected yet. If the original protected site is operational, you can reverse the direction of protection to use the original protected site as a new recovery site to protect the new protected site. Manually re-establishing protection in the opposite direction by recreating all protection groups and recovery plans is time consuming and prone to errors. Site Recovery Manager provides the reprotect function, which is an automated way to reverse protection. Reprotect uses the protection information that you established before a recovery to reverse the direction of protection. You can initiate the reprotect process only after recovery finishes without any errors. You can conduct tests after a reprotect operation completes, to confirm that the new configuration of the protected and recovery sites is valid.

1 - Module 3 Task 1

Task 1: Configure the Protected Site (GPSUS-PARTNERX-SDDC)

Configure Protected Site

IMPORTANT - Some of these exercises can only be done by one person in the group. If you find that someone in your group has already performed some of the Tasks/Exercises, please only use them as reference.

Exercise 1: Enable SRM in your AVS Private Cloud

Step 1: Private Cloud SRM Installation

  1. In your AVS Private Cloud blade, click + Add-ons.
  2. Click Get Started under Disaster Recovery.

Step 2: Deploy SRM Appliance

  1. Select **VMware Site Recovery Manager (SRM) from the drop down box.
  2. Select I don’t have a license key. I will use evaluation version..
  3. Click the checkbox next to I agree with terms and conditions.
  4. Click Install.

It may take between 10-20 minutes for installation to completed.

Monitor the progress of your deployment. When deployment completes click on Go to resource.

Step 3: Setup vSphere Replication

  1. Click + Add-ons.
  2. Click Disaster recovery.
  3. Select vSphere Replication from the drop down box.
  4. Move the slider for vSphere servers to 1.
  5. Click Install.

It may take between 10-20 minutes for installation to completed.

IMPORTANT - These steps may need to also be completed on your Recovery site (The AVS Private Cloud you’ll be paired with). Either ask someone on that group to go through these steps or perform them yourself in the other AVS Private Cloud.

Exercise 2: Create NSX-T Segment in Protected Site

Remember X is your group number, Y is your participant number, Z is the SDDC you’ve been paired with.

In this exercise you will create a network segment in the production site and deploy a test VM to be protected with VMware Site Recovery Manager (SRM).

This task requires a DHCP profile to be available in the private cloud. DHCP profiles have been configured in Module 1 for both GPSUS-PARTNERX-SDDC and GPSUS-PARTNERZ-SDDC (The other group should have configured this). If you did not complete the corresponding steps in Module 1, please go back to it and configure DHCP profiles before proceeding. Add DHCP Profile in AVS Private Cloud.

Step 1: Create NSX-T Network Segment

  1. Log in to your AVS Private Cloud NSX-T interface, click on Networking.
  2. Click Segments.
  3. Click ADD SEGMENT.

Step 2: Configure NSX-T Network Segment

  1. Give your network segment a name: SRM-SEGMENT-XY, where X is your group number and Y is your participant number.
  2. Connected gateway: Select your T1 gateway you created in a previous module.
  3. Transport Zone: Select your private cloud’s default transport zone, should read TNT**-OVERLAY-TZ.
  4. Gateway CIDR IPv4: Enter 10.XY.60.1/24.
  • For Participant 10 use 21 for group 1, 22 for group 2, 23 for group 3, etc. in lieu of XY.
  1. Click on SET DHCP CONFIG.

Step 3: Set DHCP Config on NSX-T Network Segment

  1. Under DHCP Type, ensure Gateway DHCP Server is selected.
  2. Ensure the DHCP Config toggle is set to Enabled.
  3. For DHCP Ranges enter: 10.XY.60.100-10.XY.60.120.
  4. For DNS Servers enter: 10.1.0.192.
  5. Click APPLY.

Step 4: Save your NSX-T Network Segment

Scroll down and click SAVE to save your NSX-T Network Segment. Click NO to close the configuration window. Confirm the segment is successfully configured by checking that it appears in the segments list.

2 - Module 3 Task 2

Task 2: Create a VM in the protected site.

Create a VM in Protected Site

Remember X is your group number, Y is your participant number, Z is the SDDC you’ve been paired with.

In this task you will create a test VM in the protected site.

This task requires a VM template file to be available in the private cloud. A template has been added to the private cloud’s Local Library in Module 1. If you did not complete the corresponding steps in Module 1, please go back to it and add a template to your protected site’s Local Library.

Exercise 1: Create VM fron Content Library

Step 1: Access Content Library

  1. Log into the AVS vCenter Server for the protected site GPSUS-PARTNERX-SDDC. Click the Menu bar.
  2. Select Content Libraries.

Step 2: Create VM from Template

  1. Select the Content Library you created earlier: LocalLibrary-XY.
  2. Click Templates.
  3. Click OVF & OVA Templates.
  4. Right-click on workshop-vm template which added to this library earlier.
  5. Select New VM from This Template.

Step 3: Select Name and Folder for your VM

  1. Set your VM’s name to G-XY-SRM-VM1, where X is your group number and Y is your participant number.
  2. Select SDDC-Datacenter as the location.
  3. Click NEXT.

Step 4: Select a compute resource for your VM

  1. Select Cluster-1.
  2. Click NEXT.

Step 5: Select Storage for your VM

Click NEXT on Review details and agree to License agreements.

  1. Select vsanDatastore.
  2. Click NEXT.

Step 6: Select Network for your VM

  1. For Destination Network select your previously created SRM-SEGMENT-XY network.
  2. Click NEXT.

In the Ready to Complete page, click FINISH.

Step 7: Power-on VM

  1. Click on the Menu Bar.
  2. Select Inventory.

  1. Select your newly created VM G-XY-SRM-VM1.
  2. Click the play button to power your VM on.

Step 8: Ensure IP Address has been assigned to VM

3 - Module 3 Task 3

Task 3: Create an NSX-T segment in the recovery site

Recovery Site

Remember X is your group number, Y is your participant number, Z is the SDDC you’ve been paired with.

In this task you will configure the recovery site GPSUS-PARTNERZ-SDDC with a network segment for the VMs moved by SRM from the primary site. In this lab, we focus on a basic scenario where the VMs protected by SRM do not need to retain their IP address when moved to the recovery site. A DHCP service is used both in the protected and in the recovery site to assign IP addresses to VMs when they boot.

This task requires a DHCP profile to be available in the recovery private cloud. DHCP profiles have been configured in Module 1 for both GPSUS-PARTNERX-SDDC and GPSUS-PARTNERZ-SDDC. If you did not complete the corresponding steps in Module 1, please go back to it and configure DHCP profiles before proceeding.

Log into NSX-T for the recovery site GPSUS-PARTNERZ-SDDC. Please note that, because of the AVS Interconnect connectivity that has been configured in Module 1 between the protected and the recovery private clouds, you can access vCenter and NSX-T for both from the same jump-box.

Exercise 1: Add Network Segment in Recovery Site

Step 1: Add Segment

  1. In the Recovery Site NSX-T interface click Networking.
  2. Click Segments.
  3. Click ADD SEGMENT.
  4. Give the segment a name: SRM-RECOVERY-XY.
  5. Select the appropriate T1 Connected Gateway. Use the default TNT**-T1 gateway in the recovery site.
  6. Select the appropriate Transport Zone overlay - TNT**-OVERLAY-TZ.
  7. For Subnets add 10.XY.160.1/24.
  8. Click SET DHCP CONFIG.

Step 2: Set DHCP Configuration

  1. Ensure the DHCP Type is set to Gateway DHCP Server.
  2. Ensure the DHCP Config toggle button is set to Enabled.
  3. For DHCP Ranges enter: 10.XY.160.100-10.XY.160.120.
  4. For DNS Servers enter 10.1.0.192.
  5. Click APPLY, then SAVE the network segment configuration, click NO for the next question.

4 - Module 3 Task 4

Task 4: Configure a Site Pairing in Site Recovery Manager

SRM Site Pairing

Remember X is your group number, Y is your participant number, Z is the SDDC you’ve been paired with.

In this task you will pair the protected site GPSUS-PARTNERX-SDDC and the recovery site GPSUS-PARTNERZ-SDDC.

Exercise 1: Site Pairing

Site pairing can be configured from vCenter on either the primary or the recovery private cloud. You will work on the primary site’s vCenter.

Step 1: Access Site Recovery Manager from vCenter Server

  1. Log into vCenter Server in the primary AVS private cloud GPSUS-PARTNERX-SDDC and click the menu bat.
  2. Select Site Recovery from the main menu.

Click OPEN Site Recovery.

Step 2: Create New Site Pair

Click NEW SITE PAIR.

Step 3: Select local vCenter Server

  1. Ensure your local vCenter Server is selected.
  2. Ensure Pair with a peer vCenter Server located in a different SSO domain is selected.
  3. Click NEXT.

Step 4: Peer vCenter Server

  1. Enter the vCenter Server information for the Recovery site. This should be GPSUS-PARTNERZ-SDDC.
  2. Click FIND VCENTER SERVER INSTANCES. If a warning shows up click CONNECT.
  3. Select your peer vCenter Server.
  4. Click NEXT.

Step 5: Select services identified

  1. Select the top checkbox to select all services.
  2. Click NEXT. Then click FINISH.

Step 6: Confirm Site Pairing Completes

When the configuration process completes, the SRM main page displays the new site pairing.

5 - Module 3 Task 5

Task 5: Configure Inventory Mappings

SRM Inventory Mappings

Remember X is your group number, Y is your participant number, Z is the SDDC you’ve been paired with.

In this task you will configure inventory mappings, which define the resources (networks, folders, compute resources, storage policies) that VMs must use when moved to the recovery site. It is also possible to define reverse mappings, which control resource allocation for failback processes.

Exercise 1: Network mappings

Step 1: Log in to Site Recovery Manager

In the Site Recovery interface, click the VIEW DETAILS button on the paired sites.

Step 2: Authenticate to Recovery Site

You may need to re-authenticate to the recovery site. Enter those credentials and click LOG IN.

Step 3: Create New Network Mapping

  1. Click Network Mappings in the left pane.
  2. Click NEW.

Step 4: Network Mappings Creation Mode

  1. Click to select Prepare mappings manually.
  2. Click NEXT.

Step 5: Configure Recovery Network Mappings

  1. Select first the SRM Protected Segment created earlier called SRM-SEGMENT-XY.
  2. On the right side select SRM-REcOVERY-XY.
  3. Click ADD MAPPINGS button.
  4. Click NEXT.

Step 6: Configure Reverse Mappings

  1. Select the checkbox to set the reverse mappings for the network.
  2. Click NEXT.

Step 7: Test Networks

  1. Define a Test Network. SRM allows you to specify a test network your recovered VMs will connect to when performing a DR test or you can let SRM auto create the test networks. For the purposes of this workshop leave the default of auto created.
  2. Click NEXT.

Step 8: Complete Network Mappings

To complete the network mappings setup click FINISH.

Exercise 2: Folder Mappings

Step 1: New Folder Mappings

  1. Click Folder Mappings.
  2. Click NEW.

Step 2: Folder Mappings Creation Mode

  1. Ensure Automatically prepare mappings for folders with matching names is selected.
  2. Click NEXT.

Step 3: Configure Recovery Folders

  1. Select SDDC-Datacenter on both sides.
  2. Click ADD MAPPINGS.
  3. Click NEXT.

Step 4: Folder Reverse Mappings

  1. Select all checkboxes to create the folder reverse mappings.
  2. Click NEXT.

Step 5: Complete Folder Mappings

Click FINISH button to complete Folder Mappings.

Exercise 3: Resource Mappings

Step 1: Create New Resource Mapping

  1. Click Resource Mappings.
  2. Click NEW.

Step 2: Configure Recovery Resource Mappings

  1. Expand SDDC-Datacenter on both sides and select Cluster-1.
  2. Click ADD MAPPINGS.
  3. Click NEXT.

Step 3: Reverse Mappings

  1. Select all checkboxes to create the resource reverse mappings.
  2. Click NEXT.

Step 4: Complete Resource Mappings

Click FINISH button to complete Resource Mappings.

Exercise 4: Storage Policy Mappings

Step 1: Create New Storage Policy Mappings

  1. Click Storage Policy Mappings.
  2. Click NEW.

Step 2: Storage Policy Creation Mode

  1. Ensure Automatically prepare mappings for storage policies with matching names is selected.
  2. Click NEXT.

Step 3: Configure Recovery Storage Policy Mappings

  1. Click and select vSAN Default Storage Policy on both sides.
  2. Click ADD MAPPINGS.
  3. Click NEXT.

Step 4: Reverse Mappings

  1. Select all checkboxes to create the Storage Policy Reverse Mappings.
  2. Click NEXT.

Step 5: Complete Storage Policy Mappings

Click FINISH button to complete the Storage Policy Mappings.

Placeholder Datastores

For this exercise there’s no need to create a Placeholder Datastore. If there’s no Placeholder Datastore, you are free to go and create one, just select the vsanDatastore.

6 - Module 3 Task 6

Task 6: Configure Protection Groups, vSphere Replication and Recovery Plan

SRM Protection Groups

In this task you will configure vSphere replication for the test VM created in Task 2 as well as a Protection Group for this VM and a recovery plan to protect it. This task is performed from the primary site’s vCenter Server.

Exercise 1: Create Protection Group

Step 1: Create New Protection Group

  1. Click Protection Groups.
  2. Click NEW.

Step 2: Name and Direction for Protection Group

  1. Give your Protection Group a name: PG-XY, where X is your group number and Y is your participant number.
  2. Select the direction for your Protection Group (leave the default).
  3. Click NEXT.

Step 3: Select the Type of Protection Group

  1. Select Individual VMs (vSphere Replication).
  2. Click NEXT.

Step 4: Virtual Machines

Click NEXT and do not include any Virtual Machines in the protection group yet.

Step 5: Recovery Plan

  1. Select Do not add to recovery plan now.
  2. Click NEXT.

Step 6: Complete Protection Group

Click FINISH to complete the creation of your Protection Group.

Exercise 2: Protect Virtual Machine with SRM

Step 1: Configure Replication

Make sure to disable pop-ups in your browser for this step.

  1. From your Protected vCenter Server locate the VM you created earlier, right-click.
  2. Select All Site Recovery actions.
  3. Click Configure Replication.

Step 2: Configure Target Site

  1. Select the target site to replicate the VM to.
  2. Ensure Auto-assign vSphere Replication Server is selected.
  3. Click NEXT.

Step 3: VM Validation

  1. Ensure the status of the VM validation is OK.
  2. Click NEXT.

Step 4: Target Datastore

  1. Select vsanDatastore as the location for the replicated files. Leave all other defaults.
  2. Click NEXT.

Step 5: VM Replication Settings

  1. Leave all defaults, Recovery point objective (RPO) should be set to 1 hour.
  2. Click NEXT.

Step 6: Assign to Protection Group

  1. Ensure Add to existing protection group is selected.
  2. Select the PG-XY Protection Group you recently created.
  3. Click NEXT.

Step 7: Complete Configuring Replication

Click FINISH to complete the configuration of the replication for the VM.

Exercise 3: Recovery Plans

Step 1: Name and Direction for Recovery Plan

  1. Give your Recovery Plan a name: RP-XY, where X is your group number and Y is your particpant number.
  2. Ensure the Direction of the Recovery Plan is correct.
  3. Click NEXT.

Step 2: Add Protection Group to Recovery Plan

  1. Ensure Protection groups for individual VMs or datastore groups is selected.
  2. Select your PG-XY Protection Group you created earlier.
  3. Click NEXT.

Step 3: Test Networks

Leave the defaults for Test Networks and click NEXT.

Step 4: Complete Creation of Recovery Plan

Click FINISH to complete the creation of your Recovery Plan.

Confirm Placeholder VM in Recovery Site

Log in to your Recovery Site vCenter Server and locate the Placeholder VM created by SRM.

7 - Module 3 Task 7

Task 7: Test Recovery Plan

Recovery Plan Testing

In this task you will test the recovery plan created in the previous step.

Exercise 1: Test Recovery Plan

Step 1: Initiate Test

  1. In the protected site’s SRM console, click Recovery Plans.
  2. Click the Recovery Plan you created earlier.

Click on TEST to intiate the test of your Recovery Plan.

Step 2: Confirmation Options

  1. Review the confirmation options, especifically, if you’d like to Replicate recent changes to recovery site.
  2. Click NEXT. Then click FINISH.

Step 3: Monitor Plan Status

Monitor the plan status until it reads Test complete.

Step 4: Confirm Recovery of VM in Recovery vCenter Server

Log in to the Recovery vCenter Server’s and confirm the VM you created earlier and protected has been successfully powered on at the Recovery Site.

Since this was a recovery plan test:

  • The VM in the protected site has NOT been shut down.
  • The VM in the recovery site has been attached to an isolated network segment, as per the configuration you created in a previous task.

Step 5: Cleanup

You can now complete your recovery plan testing process by cleaning up the recovery site. In the SRM console, click on the CLEANUP button.

Under Confirmation options click NEXT, then click FINISH.

This process cleans up (powers off) the VM and returns everything to the previous state for protection.

8 - Module 3 Task 8

Task 8: Run Recovery Plan

Run Failover Recovery Plan

In this task you will execute the recovery plan you configured in the previous tasks. For planned migrations, a recovery plan can be run from either the primary or the protected site. In case of an actual disaster at the protected site, it must be triggered from the recovery site (the only one that is still online). The steps to run a recovery plan are the same in both cases. In this task, we will run a recovery plan from the recovery site to simulate a disaster recovery scenario.

Exercise 1: Run Recovery Plan from Recovery Site

Step 1: Access Site Recovery in Recovery Site

  1. Log into the recovery site’s vCenter Server, click the menu bar.
  2. Select Site Recovery from the main menu.
  3. Click on the OPEN SITE RECOVERY button.

In the SRM console, open the already configured site pair by clicking on the VIEW DETAILS button.

Step 2: Run Recovery Plan

When prompted for the credentials to log into the protected site, click on the CANCEL button – we are assuming that the protected site is no longer online, because of a disaster.

  1. Click on Recovery Plans.
  2. Select the Recovery Plan you previously created.
  3. Click RUN.

Step 3: Confirm Options for Recovery Plan

  1. Click the checkbox that reads I understand that this process will permanently alter the virtual machines and infrastructure of both the protected and recovery datacenters.
  2. Select Disaster recovery.
  3. Click NEXT, then click FINISH.

Step 4: Monitor Recovery until Completion

Monitor progress in the SRM console until it shows Recovery complete. Also note the Reprotect needed label.

Step 5: Confirm Recovery

When the recovery process is marked complete, go to the recovery site’s vCenter Server and verify that the test VM you created earlier is powered on (1) and attached to the network segment also created earlier (2).

9 - Module 3 Task 9

Task 9: Reprotect the Migrated VM

Reprotection of Recovered VM

In this task, we assume that the primary site has been brought back online. Reprotection is the SRM feature that allows migrated VMs in the recovery site to be synchronized back to the protected site.

Exercise 1: Reprotect VM

Step 1: Execute Recovery Plan Reprotection

  1. Remember that your primary (Protected) site was assumed to be offline. You will need to login to it now that it’s back up, so clcik the LOGIN button and enter the credentials for your protected site.
  2. Go to Recovery Plans.
  3. Select your recovery plan.
  4. Click the 3 dots.
  5. Click Reprotect.

Step 2: Reprotect Confirmation Options

  1. Ensure the checkbox is checked for I understand that this operation cannot be undone.
  2. Click NEXT, then click FINISH.

Step 3: Confirm Successful Reprotection

Go to the protected site’s vCenter Server and confirm that a placeholder VM has been created. Because your VM in the Recovery site is ahead of the original VM on premises, roles have been reversed and the VM in the Recovery site is being replicated to the Protected (primary) site.

10 - Module 3 Task 10

Task 10: Run Failback Recovery Plan

Failback Recovery Plan

In this task, you will move the test VM back to the original protected site. This task can be performed either from the protected site’s or the recovery site’s SRM console. The steps are identical in both cases.

Exercise 1: Run Recovery Plan

Step 1: Run Failback Recovery Plan

  1. In either the recovery or protected site’s SRM interface, click Recovery Plans. You may need to re-authenticate to the other site.
  2. Select your Recovery Plan.
  3. Click RUN.

Step 2: Failback Recovery Confirmation Options

  1. Ensure the checkbox is selected for I understand that this process will permanently alter the virtual machines and infrastructure of both the protected and recovery datacenters.
  2. Since you’re performing a planned failback to the original protected site, select Planned migration as the recovery type.
  3. Click NEXT, then click FINISH.

Monitor progress. When the recovery plan run completes, go to the primary site’s vCenter Server and confirm that the test VM is back online and attached to its original network segment.

Now that the test VM is running in the protected site, you need to also restore replication towards the recovery site. This is done by reprotecting the VM again. Repeat the steps you followed in the previous task for Reprotecting a VM.

This completes the lab for VMware SRM Disaster Recovery scenario.