This is the multi-page printable view of this section. Click here to print.

Return to the regular view of this page.

Module 4 - Secure Hub

Module 4: Create and configure a Secure Hub to route traffic to the internet

This module is being updated. Some of the instructions and screenshots may not be applicable anymore. However, the concept is still valid and can be applied.

Introduction

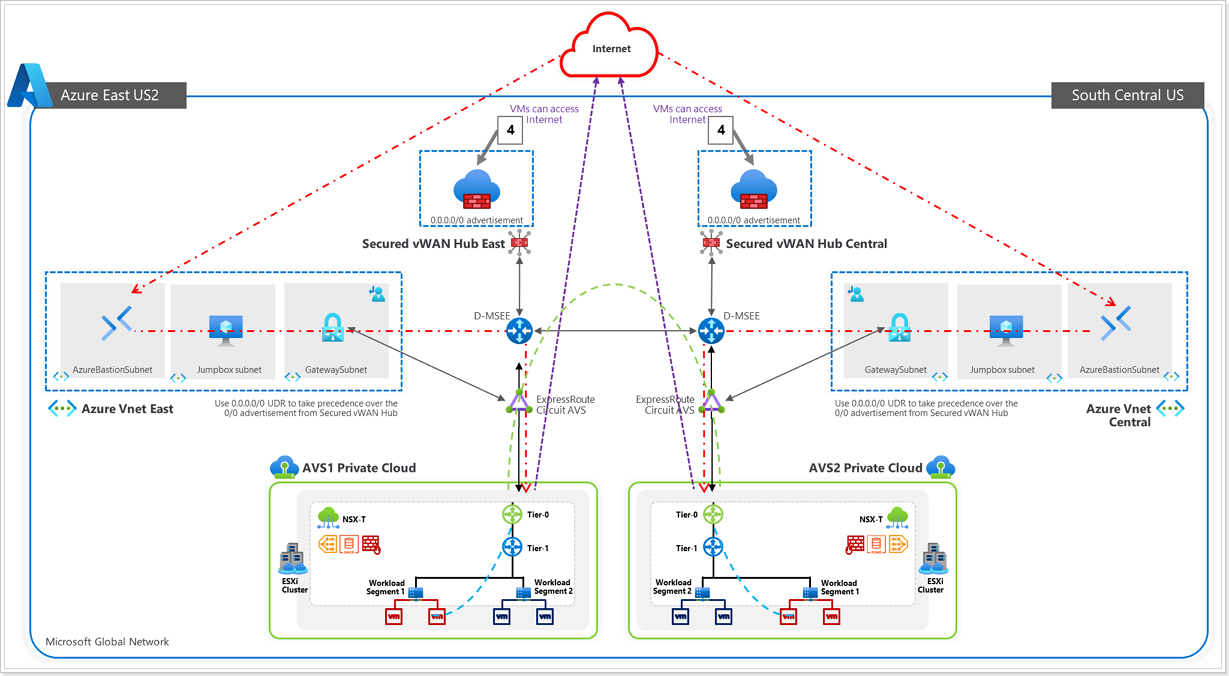
Now that the Tier-0 and Tier-1 routers are configured, it’s time to see if workloads can access the internet. The key takeaway here is to setup a Secured vWAN Hub to allow internet egress and ingress (if necessary) for the VMs on AVS.

In this section you will learn how to:

  • Create a secure VWAN hub

  • Configure Azure Firewall with a public IP

  • Configure Azure Firewall

Before we start the steps, let’s validate if the AVS VMs can access internet. In the previous section, you accessed VM1 from the vCenter portal. Verify that from VM1 that you can not

  • Access www.google.com by name. On the server, type:
    wget www.google.com

  • Access www.google.com by IP. On the server, type:

    wget https://142.250.9.101

You may also use utilities such as ping or nslookup to validate.

1 - Module 4 Task 1

Module 4: Deploy Virtual WAN

Public IP for vWAN

Exercise 1: Configure vWAN in AVS Private Cloud

Step 1: Configure Public IP for vWAN

  1. In the Azure portal, in your AVS Private Cloud blade, click Connectivity.
  2. Click Public IP for vWAN.
  3. Click Configure.

Step 2: Create Public IP Connection

  1. Virtual wide area network resource group is auto-populated and cannot be modified in the portal.
  2. Virtual wide area network name is also auto-populated.
  3. Virtual hub address block - Use the following value: 10.XY.4.0/24, where X is your group number and Y is your participant number.

It takes about an hour to complete the deployment of all components. This deployment only must occur once to support all future public IPs for this Azure VMware Solution environment.

Step 3: Confirm Successful Deployment

Ensure your deployment succeeds.

2 - Module 4 Task 2

Module 4: Propagate Default Route

Propagate Default Route

*Exercise 1: Default Route Propagation to Virtual WAN

Step 1: Access Virtual WAN

  1. In your AVS Private Cloud blade click Connectivity.
  2. Click Public IP for vWAN.
  3. Click your newly created Virtual wide area network.

Step 2: Access Hub in Virtual WAN

  1. Click Hubs.
  2. Click the name of your newly created virtual WAN.

Step 3: Edit ExpressRoute Connection

  1. Click ExpressRoute.
  2. Click on the elipsis then click Edit connection.

Step 4: Enable Propagate Default Route

  1. Ensure the Enable button is enabled for Propagate Default Route.
  2. Click Confirm.

3 - Module 4 Task 3

Task 3: Configure Azure Firewall policies

Azure Firewall Policies

Exercise 1: Azure Firewall Policies

Step 1: Navigate to Azure Firewall

  1. In the Azure Portal search bar type Firewalls.
  2. Click Firewalls.

Step 2: Select your Virtual WAN Firewall

Select your virtual WAN Firewall that should have been automatically created after the previous task.

Step 3: Azure Firewall Manager

  1. Click Firewall Manager.
  2. Click to Visit Azure Firewall Manager to configure and manage this firewall.

Step 4: Access Azure Firewall Policies

  1. Click Azure Firewall Policies.
  2. Click + Create Azure Firewall Policy.

Step 5: Firewall Policies Basics Tab

  1. Ensure you’re in the Basics tab.
  2. Leave the defaults for Subscription and Resource group.
  3. Give your policy a name: InternetEnabledXY, where X is your group number and Y is your participant number.
  4. Ensure to select your appropriate Region.
  5. For Policy tier select Standard.
  6. For Parent policy select None.

Step 6: Firewall Policies DNS Settings Tab

  1. Click DNS Settings tab.
  2. Select Enabled for DNS settings.
  3. For DNS Servers ensure Default (Azure provided) is selected.
  4. For DNS Proxy select Enabled.

Step 7: Firewall Policies Rules Tab

  1. Select Rules tab.
  2. Click + Add a rule collection.

Step 8: Add a Rule Collection

  1. Give the rule collection a name: InternetOuboundEnabled-XY, where X is your group number and Y is your participant number.
  2. For Rule collection type select Network.
  3. Give the rule collection a Priority - Should be a numeric valued between 100-65000.
  4. For Rule collection action select Allow.
  5. Leave the default for Rule collection group.
  6. Use the following values for your Rule.
NameSource typeSourceProtocolDestination PortsDestination TypeDestination
Rule1-XYIP Address*TCP80,443IP Address*

Click Review + Create and then the Create button.